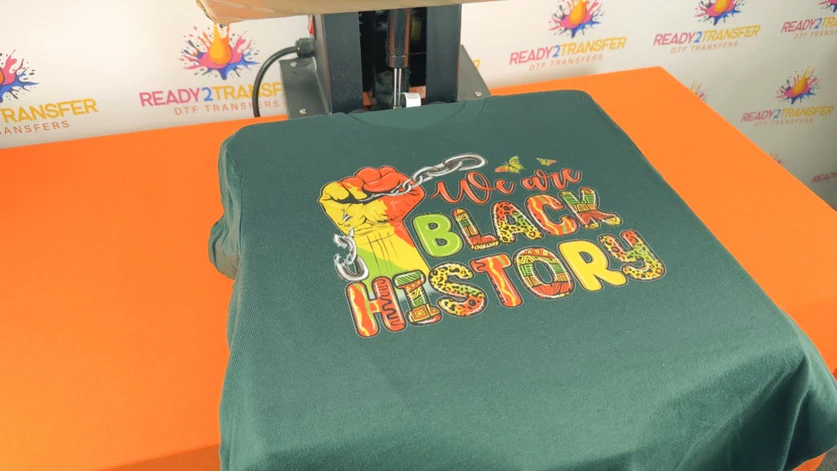
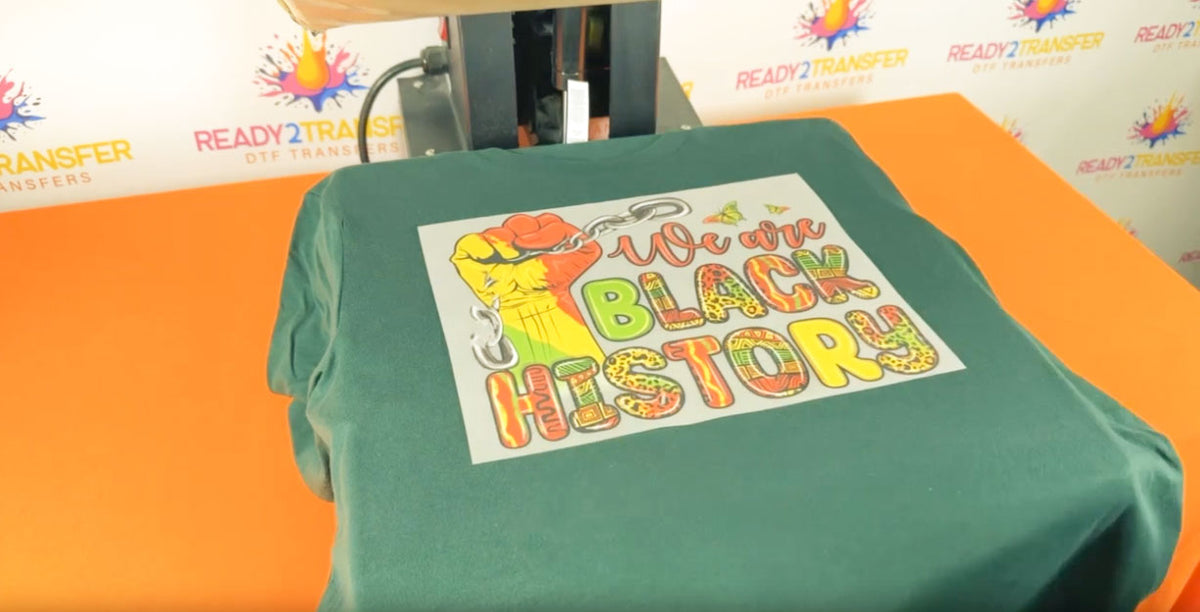
24 Hour TAT - Cut-off time 5 AM - Free Shipping On All DTF Orders Over $75

How to press DTF transfers using heat press machine step-by-step guide

How to Press a DTF Transfer Using a Heat Press Machine?

Master professional DTF transfer application with your heat press machine using our comprehensive step-by-step guide. Learn optimal temperature settings (300°F for cotton, 275°F for polyester), proper pressure techniques, and precise timing for flawless results every time.

This guide covers everything from pre-pressing your garment to applying the transfer, peeling techniques, and finishing touches. Perfect for print shops, custom apparel businesses, and serious crafters, these professional heat press instructions ensure your DTF transfers adhere perfectly to cotton, polyester, blends, denim, and more.

Apply DTF Transfers with Heat Press in 3 Easy Steps

Follow these proven professional techniques to achieve flawless results when pressing DTF transfers with your heat press machine. Proper temperature, timing, and pressure ensure your transfers adhere perfectly and last through countless washes. Heat press machines provide consistent results ideal for production work.

STEP 1

STEP 1

Pre-press your garment for 2-5 seconds at 300°F to remove moisture and wrinkles. Position the DTF transfer print-side down on the desired location, ensuring proper alignment. Set your heat press to 300°F (150°C) for cotton or 275°F (135°C) for polyester, and allow it to fully preheat. Apply medium to hard pressure across the entire transfer area for 10-15 seconds, ensuring complete contact between the transfer and fabric.

STEP 2

STEP 2

After pressing, wait 15-20 seconds for the transfer to cool slightly (warm peel method). This timing allows the adhesive to properly bond while the film is still pliable. Carefully lift one corner of the top protective film and peel it away slowly and evenly. If any part of the design lifts with the film, press that area again for 5-10 seconds and re-peel. The consistent pressure of a heat press ensures uniform adhesion across the entire transfer.

STEP 3

STEP 3

For a glossy, professional finish, place a Teflon sheet or heat-resistant cover over the design and press for an additional 7-10 seconds at 300°F with medium pressure. For a matte finish, use parchment paper instead of Teflon. This finishing press locks in the adhesive, enhances durability, and ensures your DTF transfer withstands repeated washing while maintaining its vibrant appearance. The consistent heat and pressure of a heat press machine provides superior results compared to other methods.

STEP 1

STEP 1

Pre-press your garment for 2-5 seconds at 300°F to remove moisture and wrinkles. Position the DTF transfer print-side down on the desired location, ensuring proper alignment. Set your heat press to 300°F (150°C) for cotton or 275°F (135°C) for polyester, and allow it to fully preheat. Apply medium to hard pressure across the entire transfer area for 10-15 seconds, ensuring complete contact between the transfer and fabric.

STEP 2

STEP 2

After pressing, wait 15-20 seconds for the transfer to cool slightly (warm peel method). This timing allows the adhesive to properly bond while the film is still pliable. Carefully lift one corner of the top protective film and peel it away slowly and evenly. If any part of the design lifts with the film, press that area again for 5-10 seconds and re-peel. The consistent pressure of a heat press ensures uniform adhesion across the entire transfer.

STEP 3

STEP 3

For a glossy, professional finish, place a Teflon sheet or heat-resistant cover over the design and press for an additional 7-10 seconds at 300°F with medium pressure. For a matte finish, use parchment paper instead of Teflon. This finishing press locks in the adhesive, enhances durability, and ensures your DTF transfer withstands repeated washing while maintaining its vibrant appearance. The consistent heat and pressure of a heat press machine provides superior results compared to other methods.

Your custom shirt or garment is ready!

With our premium DTF transfers and your heat press machine, create professional custom apparel efficiently. These durable, vibrant designs withstand repeated washing and maintain their color and clarity for years. Follow the 3-step process above, then wait 24 hours before the first wash for optimal adhesion. Heat press machines provide consistent, professional results perfect for production work and bulk orders. Always follow garment care instructions and wash inside out when possible to preserve your custom design.

Frequently Asked Questions

What type of heat press machine is best for DTF transfers?

Any professional heat press machine with adjustable temperature and pressure works well for DTF transfers. Swing-away or clamshell models are ideal as they provide easy access for positioning transfers. Look for machines with digital temperature control, consistent pressure distribution, and platen sizes that match your project needs. Popular brands include Geo Knight, Hotronix, and Stahls' for professional results.

Why use a heat press machine instead of an iron for DTF transfers?

Heat press machines provide consistent temperature and even pressure distribution across the entire transfer area, ensuring professional results every time. Unlike irons, heat presses maintain steady temperature, apply uniform pressure, and offer precise timing control. This consistency is essential for production work and ensures your DTF transfers adhere properly and last through repeated washing.

Can I use a heat press for bulk DTF transfer production?

Absolutely! Heat press machines are the preferred method for bulk DTF transfer production. They offer faster production times, consistent results, and better efficiency than manual methods. Professional heat presses can handle hundreds of transfers per day with reliable, uniform results. This makes them ideal for print shops, custom apparel businesses, and anyone running production orders.

What temperature should I set my heat press for DTF transfers?

Set your heat press to 300°F (150°C) for most DTF transfers. This temperature works best for cotton and most fabric blends. For polyester, use 275°F (135°C). Always pre-heat your heat press to ensure consistent temperature before pressing DTF transfers.

How long should I press DTF transfers with a heat press?

Press DTF transfers for 10-15 seconds with medium pressure using a heat press machine. Apply even pressure across the entire transfer area. For thicker fabrics or larger designs, you may need to press for 15-20 seconds. Always follow the specific instructions for your transfer type.

Do I need to pre-press the garment before applying DTF transfers with a heat press?

Yes! Pre-press your garment for 2-5 seconds at 300°F to remove moisture and wrinkles. This crucial step ensures better adhesion and prevents bubbles or wrinkles under your DTF transfer. Always work on a clean, flat heat press surface.

What pressure should I use on my heat press for DTF transfers?

Apply medium to hard pressure when using a heat press for DTF transfers. The pressure should be firm and even across the entire transfer area. Most heat press machines have adjustable pressure settings - use medium-high pressure for best results with DTF transfers.

Should I peel DTF transfers hot or cold when using a heat press?

Wait 15-20 seconds after pressing with a heat press, then test a corner. Most DTF transfers can be peeled while warm (not hot). If the transfer resists peeling, wait until completely cool. Follow the specific instructions provided with your DTF transfer for best results.

Do I need a finishing press after applying DTF transfers with a heat press?

Yes, a finishing press is recommended for extra durability. Cover the transfer with Teflon for a shiny finish or parchment paper for a matte finish, then press for another 7-10 seconds at 300°F using medium pressure. This step helps seal the DTF transfer and improves longevity.

Can I use a heat press for different fabric types with DTF transfers?

Yes! Heat press machines work excellently with DTF transfers on cotton, polyester, blends, denim, leather, and more. Adjust temperature slightly for different fabrics: 300°F for cotton, 275°F for polyester. The consistent pressure of a heat press ensures professional results on any fabric type.

What if my DTF transfer doesn't stick properly with a heat press?

If your DTF transfer doesn't stick, check that your heat press is at the correct temperature (300°F), ensure you're applying enough pressure, and pressing for the full 10-15 seconds. Make sure the garment is clean, dry, and pre-pressed. Verify your heat press platen is making full contact with the transfer area.

What's the advantage of using a heat press vs. other methods for DTF transfers?

Heat press machines offer consistent temperature and even pressure distribution, making them the most reliable method for pressing DTF transfers. They provide professional results, faster production times, and work better for bulk applications. Heat presses ensure uniform adhesion across the entire transfer area, reducing errors and improving durability.